Sunday, April 22, 2012
Just An Exacto This Time
These are some pictures of my second model, this time, to full scale and proportion. Although, the top is not fitted and functional like the final lid will be this model gives a much better feel for how the final box will look complete with decorative ornament on the sides. I am still contemplating the arrangement of the three lines, but I would like them to vary in thickness and wood color. I will most likely use walnut and a lighter wood like cherry or maple. Once again I used hot glue and T-pins to adhere the sides and bottom. Working with this foam was much easier because the pieces were already 1/2" thick and I was able to use an exacto knife to make straight cuts through the coarser foam. I had established my dimensions with the first model an was able to finalize a plan for how much wood I needed to purchase making getting started on the final model much easier.
Break Out the Butcher Knife
Here are the preliminary models of my vessel. These models were made from Styrofoam typically used in artificial plant arrangements. I chose this material because it was a simple and fairly inexpensive alternative to clay and less time consuming than wood. The model shows the design of the final box, but is inaccurate in the dimensions as I cut it from a pre-cut cube. The lid, white, is also Styrofoam, but was purchased in a flat sheet of about 1/2" in thickness. I cut the block in the same manner and order that I would be cutting the final wood box to get a feel for the most effective way to do so while assessing the thickness of the sides and how thin I would be able to make them. Here the walls are about 1/2" thick. The adhesive I used to construct the model is hot glue with T-pins for support in the corners. I used a large kitchen knife to carve and cut the foam.
In The Name Of Wood; Purpose Statment
Initally, I wanted to construct a practical box. To quote the great modernist architect Louis Sullivan, “Form Follows Function.” I envisioned a box for a key shaped like a door knob or a key hole. After some unsuccessful sketches I
scratched the generic idea of a vessel to hold my spare car key. Thinking more sentimental, I then had the though to create a box in the shape of the Buddhist om after the shape of an old ring that I cherish. Once again I sketched over the idea and realized a jewelry box as also too generic. On the brink of exploding frustration my thought process did a 180. I can always use containers in my kitchen. The wooden box may not be able to hold food, but it would be perfect for prepackaged items such as tea, candy, coffee, granola bars, or even pop-tarts.
Tea for Thought
I will construct a vessel that will accommodate the size and shape of a box, or loose tea packets. This container will allow me to contain my tea supplies in an easily accessible location and will also serve as a decorative ornament for my kitchen counter top.
And We're Off; Project #3
In the most simple way possible; “design and build a vessel that holds something of special meaning to you” was the prompt for this project. I was assigned to construct a wooden box complete with a functioning lid from any wood of choice. The boxes initial cuts must be made using a bandsaw and its size cannot exceed 5inx8in with no restrictions on height. I was very excited for this project and encouraged by the prompt to be creative yet within the realm of good craftsmanship. I knew I wanted to focus on a vessel that would be constructed properly, with minimal flaws, as well as radiate
personal flair. I began first with a concept map and rough idea sketches.
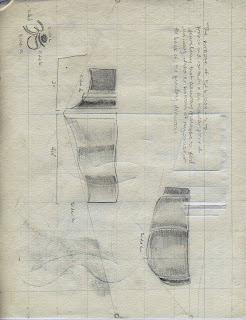
These are sketches of some preliminary ideas for my vessel. The top image is my final idea sketch and the box that I chose for this project. It shows some of the dimensions and how I would go about making cuts into the solid block of glues wood pieces.
Tuesday, April 10, 2012
Nature & Asthetics of Design
Art makes life worth living.
This is the point that was made in the article Nature & Aesthetics of Design. The author begins by assessing the material aspect of life, and by such means the physical material, not how much your double-shot latte from Starbucks cost (x3 per day). Physical materials are the building blocks of our civilization. Where would we be without glass and steel? Cotton and linen? Even our greatest homo sapiens ancestors assessed the value of material to accommodate their lifestyles. Animal fur was warm and and leather underside made for a though, long lasting piece of clothing. Precisely why moccasins are leather and not cotton.
The author then leads into talking about how these materials and the designs of these materials are what indirectly make us happy. It may seem far fetched, but it is completely accurate. We are happy when situations are convenient, when we get great service at a restaurant, or when it's snowing and our living room couch is always toasty. These are just a few obvious examples of how materials make us happy.
The author's next objective is to relate complete human happiness to art and design by working his or her way through the related topics of materials. Artists make the world a better place to be, is essentially the article's motto. Without these artists and designers creating things that are comfortable, pleasing to the eye or hand, and intriguing there would be very little substance to our lives. On the same level, without depression, pain, and moments of sadness there would be no appreciation for these works of art. If the weather was always temperate, we would never appreciate central heating and air conditioning.
Tuesday, March 13, 2012
Let's Play A Game; I Spy
After we completed the constructing part of the assignment we began perspective drawing, taking simple chair styles and drawing them in relation to the horizon line. I played around with where the object sat according to the horizon line and decided on the best fit for my seat. Prior to engaging in the final drawing (image #2) I used Inda ink and a brush for some gestural drawings to better understand perspective and how other objects would fit into my final drawing. The intricacies of the front face of my chair posed a few minor issues but they were easily sorted out. Slightly more difficult perhaps was the angle at which I cut the horizontal tabs that held the vertical panels in place (~2" apart). I had cut them so that the back tabs were at about a 30 degree angle toward the ground and the front tabs so that they were about 30 degrees in the opposite direction. This is evident from teh photos, but for drawing purposes and to maintain correct perspective they are strictly perpendicular to the vertical panels. As is evident in drawing one, my first perspective drawing. There is an aspect of incorrect perspective, can you find it?... I'm sure. My error in this was taking the front most edge of the back post and taking it back to the incorrect vantage point on the left, instead of following the angle of the front and back edges of the seat to check myself. Lesson learned and the final drawing turned out well. Even with the added surprise of having to incorporate an elephant!
Here is an Elephant Song:
Thursday, March 1, 2012
A Chair, of Cardboard
The cardboard chair is complete! After an all-nighter in the design studio and copious amounts of recycled paper and discarded drawings my final product turned out looking nothing like my original idea that I was just certain was fool proof. After discovering the difficulty of making a solid cardboard box to serve as the seat for a four legged stool I essentially inverted the model and added layers of inserts for the chair seat. The three posts on the back are primarily for structural stability although with more time and effort could have been fashioned into a functioning backrest, as they are certainly stable enough for that. The chair is approximately 24"x 18"x 24" (seat) and the posts are 3.5"x 3.5" x 48". During the building process I came up with a fairly simple and sturdy idea for another kind of stool ( still about 36" in height), but as it was a matter of time and supply I was unable to construct it as well.
Subscribe to:
Posts (Atom)